contact us
products
- Main Products
technical articles
Company News
There are three main reasons for having instruments calibrated:
- To ensure readings from an instrument are consistent with other measurements.
- To determine the accuracy of the instrument readings.
- To establish the reliability of the instrument i.e. that it can be trusted.
- Traceability: relating your measurements to others
- Uncertainty: how accurate are your measurements?
- Reliability: can I trust the instrument?
- Achieving Traceability in your measurements
- Adjustment: what a calibration is not
- What a calibration certificate contains
Traceability: relating your measurements to others
The results of measurements are most useful if they relate to similar measurements, perhaps made at a different time, a different place, by a different person with a different instrument. Such measurements allow manufacturing processes to be kept in control from one day to the next and from one factory to another. Manufacturers and exporters require such measurements to know that they will satisfy their clients’ specifications.
To ensure that measurements can be related in this way New Zealand uses the International System of Units or SI (from the French ‘Système International’), which defines a system of measurement units that cover the measurements we make each day. For example it includes definitions for the metre, the second, and the kilogram.
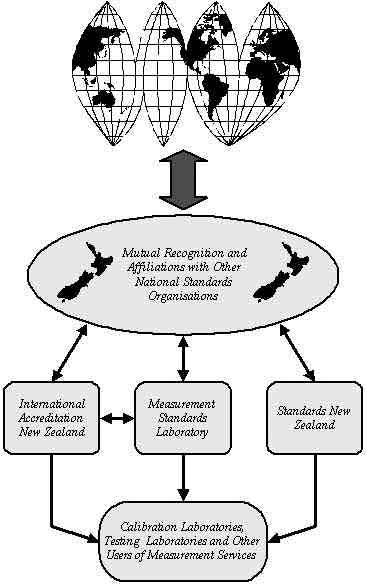
Most countries have a system of accreditation for calibration laboratories. Accreditation is the recognition by an official accreditation body of a laboratory’s competence to calibrate, test, or measure an instrument or product. The assessment is made against criteria laid down by international standards. In New Zealand IANZ is the official body. These laboratories are accredited to ISO Guide 25 Requirements for Technical competence of Calibration and testing laboratories. Accreditation ensures that the links back to the national standard are based on sound procedures.
For measurements to be compared they must share a common measurement system.
Uncertainty: how accurate are your measurements?
Ultimately all measurements are used to help make decisions, and poor quality measurements result in poor quality decisions. The uncertainty in a measurement is a numerical estimate of the spread of values that could reasonably be attributed to the quantity. It is a measure of the quality of a measurement and provides the means to assess and minimise the risk and possible consequences of poor decisions.
For example we may want to determine whether the diameter of a lawn mower shaft is too big, too small or just right. Our aim is to balance the cost of rejecting good shafts and of customer complaints if we were to accept faulty shafts, against the cost of an accurate but over engineered measurement system. When making these decisions the uncertainty in the measurement is as important as the measurement itself.
A measurement with a stated uncertainty can be compared to others
The uncertainty reported on your certificate is information necessary for you to calculate the uncertainty in your measurements. In section 3.3 we give some guidelines on how to interpret the uncertainty, and an introduction to calculating the uncertainties in your measurements.
Measurements are traceable when they can be related to a recognised measurement system, through an unbroken chain of comparisons, each with stated uncertainties
Reliability: can I trust the instrument?
Many measuring instruments read directly in terms of the SI units, and have a specified accuracy greater than needed for most tasks. With such an instrument, where corrections and uncertainties are negligible, the user simply wants to know that the instrument is reliable. Unfortunately a large number of instruments are not. for calibration are judged to be unreliable or unfit for purpose in some way. This failure rate is typical of that experienced by most calibration laboratories and is not related to the cost or complexity of the instrument.
Reliability is judged primarily by the absence of any behaviour that would indicate that the instrument is or may be faulty.
A calibration certificate will be issued only if an instrument is found to be reliable, and will satisfy its intended purpose
Back to top >>
Achieving Traceability in your measurements
Many quantities of practical interest such as colour, loudness and comfort are difficult to define because they relate to human attributes. Others such as viscosity, flammability, and thermal conductivity are sensitive to the conditions under which the measurement is made, and it may not be possible to trace these measurements to the SI units. For these reasons the international measurement community establishes documentary standards (procedures) that define how such quantities are to be measured so as to provide the means for comparing the quality of goods or ensuring that safety and health requirements are satisfied.
To make a traceable measurement three elements are required:
- An appropriate and recognised definition of how the quantity should be measured,
- A calibrated measuring instrument, and
- Competent staff who are able to interpret the standard or procedure, and use the instrument.
Traceability is ensured only if these three factors are present in the measurement process
For those who buy their measurement services from other companies it pays to purchase from a laboratory that has been independently assessed as being technically competent to provide the measurement services. In New Zealand ISO Guide 25 accreditation with IANZ’s testing laboratory program provides the only internationally accepted evidence of competence. Accreditation to ISO Guide 25 has specific requirements for technical competence and is distinct from certification to the ISO 9000 series quality systems, which are simply management tools.
To facilitate trade between New Zealand and other countries, IANZ has mutual recognition agreements with other countries so that, for example, test reports endorsed by NATA (Australia) and NAMAS (UK) are recognised in New Zealand, and IANZ endorsed reports are likewise accepted in Australia and the UK.
Back to top >>

Figure 1: The measurement system.
Adjustment: what a calibration is not
Calibration does not usually involve the adjustment of an instrument so that it reads ‘true’. Indeed adjustments made as a part of a calibration often detract from the reliability of an instrument because they may destroy or weaken the instrument’s history of stability. The adjustment may also prevent the calibration from being used retrospectively.
Adjustments may completely invalidate an earlier calibration
In section 4 we describe how to plan adjustments and calibrations to minimise the loss of confidence in the instrument.
What a calibration certificate contains
Your calibration certificate must contain certain information if it is to fulfil its purpose of supporting traceable measurements. This information, which is listed in ISO Guide 25, can be divided into several categories (see appendix for more details):
- it establishes the identity and credibility of the calibrating laboratory;
- it uniquely identifies the instrument and its owner;
- it identifies the measurements made; and
- it is an unambiguous statement of the results, including an uncertainty statement.
In some cases the information contained in your certificate might seem obvious but ISO Guide 25 grew out of the experience that stating the obvious is the only reliable policy.


