contact us
products
- Main Products
technical articles
Company News
This is the second part of an article on thread gauges. In Part:1 of the article, we covered thread plugs, thread ring and caliper gauges, which are mostly used in shops for the checking of threaded parts. In this part, we shall see the other thread gauges, which are mostly used in Standards Room.
Thread Gauges Used for Checking Basic Thread Gauges
What will happen if the thread gauges used on the shop floor get worn out due to constant usage? Thread gauges need to be periodically calibrated in the Standards Room to check whether the gauges are still in usable size range.
Inspecting and physically measuring the dimensions of a “male gauge” i.e. a thread plug gauge, is rather easy, because the pitch diameter is easily amenable for metrological measurements in the Standards Room. But physically measuring a “female gauge,” namely, a thread ring gauge is not at all easy. When a new ring gauge is made, how then is it checked for correctness? After some usage, how is the ring gauge checked to see whether it is worn beyond limits? What is the practical way out?
That’s where “Check plug gauges” come into picture. A new thread ring gauge is basically just a “nut” with much closer tolerances. So, this “nut” can be easily inspected by another thread plug gauge, with still stricter tolerances and that’s precisely what the “Check plug gauges” are designed for.
-
i) Check plugs for new thread ring gauges GO and NO-GO:
We have already seen that we have thread rings gauges to check GO and NO-GO. So, naturally, we require Check plug gauges to check the newly made GO ring gauge and also the NO- GO ring gauge. These check plugs will each have a GO and NO-GO member. But there is a small concession.
ii) Wear Check plugs for used thread ring gauges GO and NO-GO:
We require one wear check plug for the GO thread ring and another for the NO-GO thread ring gauge. A wear check plug is only a NO-GO device. What this means is that a wear check plug should not enter into the thread ring more than one turn on either end of the ring.
Now we shall see what the “concession” that we mentioned earlier is. When a Wear check plug for the NO-GO thread ring is available, a separate NO-GO check plug for the ring is not necessary. i.e., just a GO check plug alone is good enough for the new NO-GO ring. The wear check plug itself can be used as though it is a NO-GO check plug.
Though it may be a bit confusing when you read all these for the first time, it is really not too difficult grasp these finer aspects if you read the above paragraphs a second time.
iii) Setting plugs for adjustable thread ring gauges:
We have seen under (c) that there are adjustable ring gauges in use and they are required to be set to the correct size. For that purpose, there will be a GO sized setting gauge and a NO-GO sized setting gauge for the ring gauges. After setting, they have to be checked with respective NO-GO Check Plugs for non-entry.
iv) Setting plugs for thread caliper gauges:
We have seen under (d) that there are thread caliper gauges in use and they are required to be set to the correct size. For that purpose, there will be a GO sized setting gauge and a NO-GO sized setting gauge for the caliper gauges. The correct setting is when the setting gauges smoothly pass through the gauges using gravity alone.
All the above gauges cover most of the gauging requirements for threaded parts and for gauge manufacture and calibration. Before we wind up, let us also look into another gauge popularly in use.
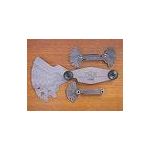
Fig.a Thread Pitch Gauge
-

-
-
v) A thread pitch gauge:
A thread pitch gauge is a visual checking device to identify the pitch of a threaded part and it is NOT a typical metrology/inspection device. When you come across a new screw or a nut and you are not sure whether it is a metric thread, British thread, or any other thread and you need to quickly check the pitch and, to an extent, the profile, you can make use of a thread pitch gauge.
A pitch gauge usually comes as a set of thin plates or leafs, with hacksaw-like teeth precisely machined to a given thread pitch (or TPI – threads per inch) and thread profile (specific flank angle and tooth depth). You have to pick out one plate (leaf) from the gauge, try to match it with the threaded part, and if it does not sit snugly, try another plate in the gauge.
When all the teeth in a specific gauge leaf sit properly on the part being measured (ie without a gap), you can read the pitch size engraved in the leaf of the gauge in use. By looking at the light-passing between the gauge and the part, you can, to some extent, decide about the matching of the flank angle of the thread as well.
But a pitch gauge is not a one hundred percent foolproof device to check and determine a thread pitch and type. Unless the inspector is experienced, there is the possibility of making a mistake in determining the correct pitch/ thread type, particularly if the thread is too fine and the pitch happens to be close to a nearby metric /SAE size thread.
Again: a pitch gauge is only a visual comparator. It does not decide acceptance or non-acceptance of a threaded part like a GO/NO-GO gauge. It is not a metrology device in the strictest sense.


